Disclaimer first! No rain forests have been harmed in the restoration of this locomotive. Drawing 21372 is quite clear what material the cab louvres are made of:
Teak is a hardwood that comes from Burma. So at one level sourcing it is both politically and environmentally insensitive. Fortunately, a form of ‘carbon capture’ popular with men of a certain age is to store away nice looking bits of wood in garages with that false promise to the wife that "I’ll do something with it someday". Thirty odd years and no bookshelves later, the spectre of 4415 has lumbered over the horizon.
We don’t need a lot of teak, but we do want teak because we’re trying to get those details right.
There must be quite a lot of those unstarted bookcase projects out there, as an appeal in the Ffestiniog Railway Magazine brought in more offers than we could possibly expect. So, with materials to hand, Clive Bickley has set to and made the frames.
As Clive said in his e mail with the progress photos, that’s the easy bit done, now he has to make 42 slats and then the 84 mortise and tenon joints!
This is the finished product we are looking for.
Feel free to correspond re the above photograph. It is of 4415; yes, we are fitting the shutters and no, we are not fitting the double skinned roof.
Will we be putting 24nr ½” holes in the roof for no particular reason? Of course. I assume that the double skin roof would not go under the NWNGR bridges, as in the photos of the loco at Dinas it does not have a second skin.
Wednesday, 11 December 2019
Thursday, 21 November 2019
Cloning progress
The blog report for May outlined plans to clone the parts of the MDB2 from the road roller which we
do not have drawings for. The first item to be tackled was the rocker covers and our pattern maker,
Bob Smith has come up trumps. Great news for the project and good to have Bob getting into the swing of things…
Because the next thing we would like him to have a pop at is the rather substantial and quite
complicated body for the fuel pump & governor.
This is the casing from the MDB2 engine after it has been gutted:
It is quite a beast and it is not a pure replica that is required, as the fuel pumps themselves sit on top of the central block and as this is the block for an MDB2 and we need a unit for an MDB4 it will need stretching:
There is also an end cap, to go on the left hand end in the above photos:
And the governor itself (which sits in the right hand portion of the body) has two cast weights which and attached to another casting.
Let’s all hope that Mrs Smith is a very tolerant woman!
Braking News!
Back in September Nutexa Frictions returned the band brake straps
with their new Ferodo liners, which has prompted Rick to crack on
with another sub-assembly. After a day of prevarication and
elliptical hole measuring he came to the conclusion that it would be
easier to replace a substantial lump of the compensating mechanism
than repair it:
As
it measures 2”x 1¾” it’s a fair old chunk of steel, and I think he
enjoyed the challenge of machining on the radiussed end that no-one
will ever see:
This
is the sub-assembly drawing:
A
bit more grey paint, two more new pins and it will be ready for
fitting:
Monday, 16 September 2019
Cab Heater and Band Brake
The refurbished radiator/ cab heater for KS4415 has been returned from Exeter & Newquay Radiators. It’s a beautiful thing and incorporates a header which came with the MDB4 from Armley Mills, the original header being in a bad way.
Clearly it now needs a great big plate, with a great big spelling mistake on it to reminder the driver of the Kerr Stuart Diesel Locomotive that the power under the bonnet (and half way into the cab) comes from McLaren.
Looking at the cab layout, if they hadn’t gone for the colonial shuttered look they could have made the cab heater a lot smaller.
Having said that, the standard gauge loco Kerr Stuart made for the Ravenglass & Eskdale Railway had a cab more suited to wetter climes, an MDB6 and still had the radiator in the cab.
We have now removed the ‘MacLaren’ plate from the roller radiator and our intention is to use this as a pattern to cast a replica. The 4415 Merchandising team think these are an ideal man-cave addition that all (well, one or two) 4415 enthusiasts will desire. Get in touch if you’re interested and we’ll confirm a price once contact has been made with a foundry.
Another ticked off job is the band brake straps which have been fitted with new Ferodo liners by Nutexa Frictions.
To put these components into context the band brake is a drum on the layshaft and these two shoes clasp onto it, the brake being operated by an impressive lever in the cab, all coloured a lovely sandy shade on the GA below.
In all the enthusiasm for painting things grey the drum for the band brake has been painted. It now needs un-painting. We have a method statement which involves a big bit of emery cloth, someone lying on their stomach and a trip to Porthmadog for the loco frames. Unfortunately the accompanying risk assessment suggests that not all good ideas are actually good.
This was the complete, front-end assembly before restoration commenced, and apart from replacing the pins all of the components (including the turn buckle) are fit for re-use:
It makes a change from the usual closing shot of paint drying!
Monday, 5 August 2019
Badges!
KS4415 It’s a bit of niche market and if you are keen enough to be following this you’ve probably got the books already. If not, why not? All items available from the Ffestiniog Railway Heritage Group website https://www.frheritage.org.uk/sales Payment by Paypal
R.E.V. GOMM Badges:
There is only one way to really mark a railway locomotive restoration project; A genuine Gomm badge. These little gems are only available from the FR Heritage Group and all profits will go to the restoration of Kerr Stuart 4415.
Available in original grey livery £5.00 including p&p or £4.00 for cash if we can arrange to meet in the back room of some Porthmadog pub!
As you can only buy them from the FR Heritage Group this could be termed an exclusive offer, but the exclusive offer comes with a limited edition, exclusive offer!
We have a limited edition of 50 badges in the Mauritian Green livery. These are also available at £4.00 cash/£5.00 including P&P.
Do you go grey or do you go limited edition green? To make the choice easier, you can only buy a green one if you buy a grey one. If you think that is unreasonable look at it from this perspective, the more badges you buy the sooner we will all see the engine running!
Fifteen Shillings Change by Kerr Stuart & Co Ltd. Re-printed by the Industrial Railway Society. ISBN 1901556575 Softback 280mm x 21mm, 30 pages, 14 illustrations
Thursday, 18 July 2019
A rush of cash to the head!
Thanks to the generosity
of the Ffestiniog Railway Society some more funding has been made
available to the project. The KS4415 Appeal
(http://www.ffestiniograilway.org.uk/news_post/2019-01-01-kerr-stuart-4415-appeal
) has so far raised around £10,000 of its £30,000 target which
leads to the conclusion that if more people had those 1920s trousers
that went up to their nipples they might be able to reach their
wallets.. Anyone contributing over £100 will get a free copy of the
Kerr Stuart "15 Shillings Change" brochure, and there are Gift Aid
opportunities. I think this means that if you put £400 in we have to
send a copy of "15 Shillings Change" to Philip Hammond.
Enough on fund raising,
let's crack on with the serious business of spending money. The tasks
to restore the locomotive can be broken down in three ways; those
which require effort, those which require thinking and those which
require money. So far we have expended a lot of effort, and applied
some thinking in sorting out the drawgear and gearbox mounting.
While there are still tasks which fit the first of these two
categories (restoring the body needs effort, providing new injectors
and fuel pumps need thinking), we do have quite a few components
which need specialist input and therefore good old fashioned cash.
Number One is the
crankshaft, dispatched to Farndon Engineering in October. They are
now very close to forging the new shaft:
(That’s not little grub screws holding it together that you can see, they are plugs in the end of the oilway passages.)
Let’s hope that Nutexa
Frictions appreciate the quality of the box the band brake shoes have
been dispatched in for new linings to be fitted:
The packaging for the
radiator, off to Exeter & Newquay Radiators is more mundane:
Also off for specialist
attention are the cylinder heads to T&L Engineering:
In the thinking category,
the pistons from cylinders 1, 3 & 4 have been crack tested. We’re
pondering if cylinder Nr2 can be repaired or if it needs replacing:
The cylinder liners have
also been removed for assessment:
One of the big challenges
is the injectors (or ‘atomisers’) as they were termed at the
time. Rick has stripped down one from the MDB2 engine (out of the
roller), made a couple of new components and got it working.
The exciting little video of it on the Facebook page https://www.facebook.com/KS4415/
provides a real contrast to the pathetic snot of Diesel which it blew out on the
first attempt. Fortunately McLaren drawing DL1693 provides the
manufacturing details for all of these components and with increased
confidence regarding how they work, we are getting close to the point
of manufacture.
The governor & fuel
pump assembly is the other thing which needs some thinking about. We
do not have a full set of drawings for this unit. This is the
assembly from the MDB2:
The governor is in the
body on the right, which transfers and combines with the movement of
the throttle in the body on the left, which then adjusts the stroke
of the fuel pumps by raising and lowering the upper assembly in the
centre box, which is operated by the cams on the centre shaft in the
photo below:
If
you compare this photo with the drawing in the 25th May
entry, you can see that while the general principles remain the same
there are some fundamental differences. On the GA drawing there are
75 different part numbers. Fathoming out how to re-create this may
take some time.
It might need money and
thinking, but it also still needs effort. Martin Greenland applies
another coat of paint to smarten up the frames for the WHR Past,
Present & Future event in June:
Saturday, 25 May 2019
Hello Dolly!
If you go
back to 2/11/16 you may recall why the 4415 project team does not
provide horse racing tips; having considered putting money into three
different Diesel engines we decided to back the horse with the broken
leg. This ‘horse’, the MDB4 engine had damage to the crank case,
a broken crankshaft, a damaged piston, no injectors (atomisers in the
language of 1928) and no fuel pump. While we have a very
comprehensive set of drawings for the locomotive and some drawings
for the engine, the set of engine drawings is incomplete. The
drawings we have come from the McLaren archives held at Armley Mills
museum, who also kindly donated the MDB4 engine to the project. In
the back of another of their sheds was something to covet:
This
particular wonky donkey of a horse is a Barford Perkins road roller.
Precise vintage unknown, but the interest from the 4415 project
perspective is that the motive power comes from a McLaren MDB2
engine, the two cylinder variant of the MDB4. The great thing about
the roller engine is that it is substantially complete, with fuel
pump, governor & atomisers. Obviously (by definition) there are
not enough of the components the project needs for cannibalisation,
but cloning is the technology of the future.
In line with
the project ethos, recovery of the roller was done by the team in some
style, that style being provided by Foden, courtesy of Dave Walker.
For the
roller, there must be a sense of déjà vu, it does not look any
happier in its new home in Wales:
The
continued support of the Armley Mills museum to the project is
greatly appreciated. The roller is on loan, to enable investigation
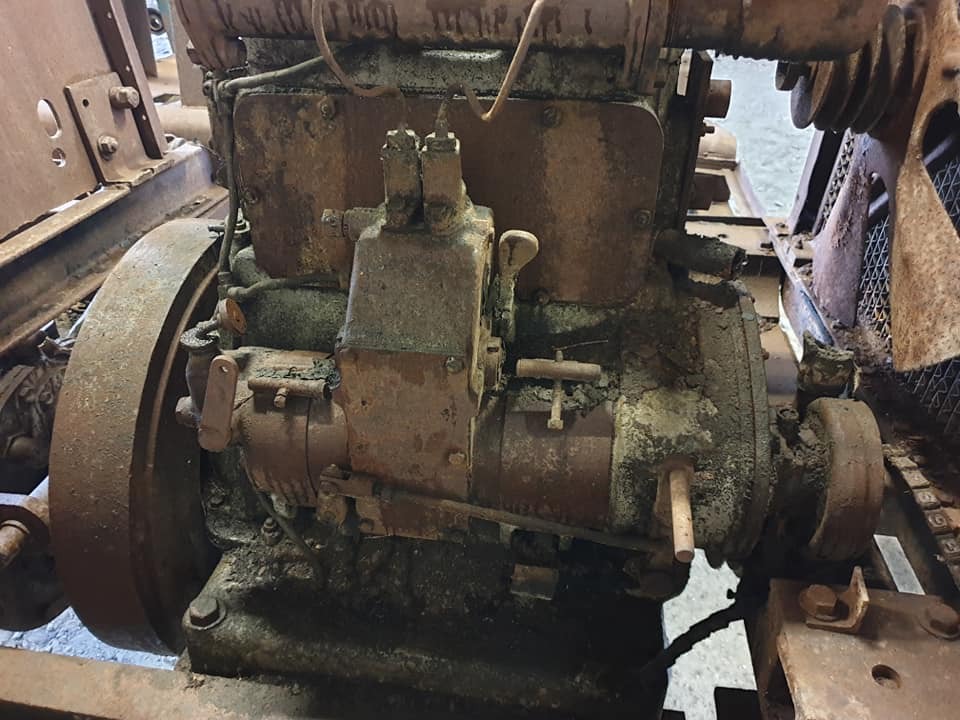
and replication of the components missing from the MDB4 engine. The
governor/ fuel pump assembly (in the photo below) is of particular
interest and can be compared with illustration of the MDB4 from "15/- change":
When the two
photos are compared, the fuel pump assemblies can be seen to be
similar, but not identical, and it is not just that one has two fuel
lines running from it and the other four. It might be because some of
the McLaren drawings we have for the fuel pump are labelled ‘for
Old Type Fuel Pump’ which infers that there
is a new type too. We have some detail drawings and can be very
confident that we can recognize an old type governor ball thrust when
we see one; whether we can tell if the MDB2 fuel pump is ‘old type’
or ‘new type’ will require some expertise that merges the roles
of diesel fitter & chicken sexer, and the governor ball thrust is
very much an integral part of the whole fuel pump assembly.
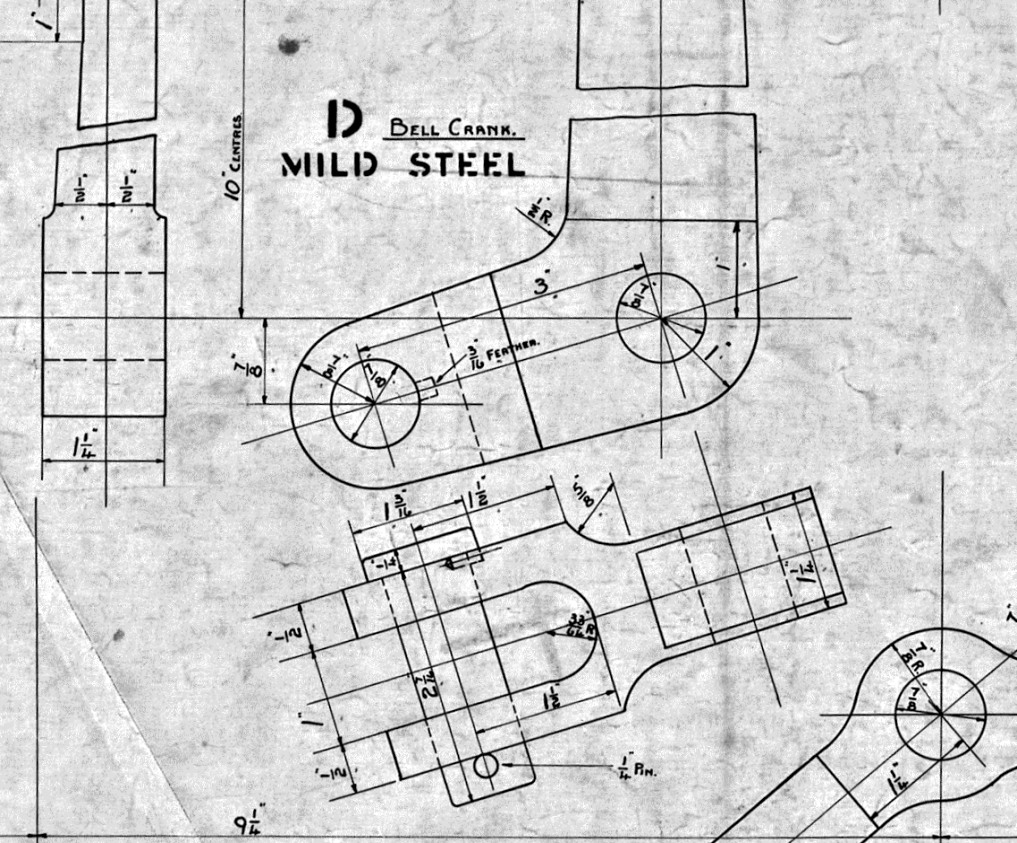
Whether the
drawing below represents the ‘new’ or the ‘old’ type unit we
do not know, but there’s quite a bit of work in making one of
these.
We’ll keep
you posted on progress.
The other main items of interest are the atomisers. We do have a good set of drawings for these, but it's nice to actually see one.
![]() |
![]() |
A reminder:
MDB2. It has two cylinders and therefore two atomisers. It would
have been nice if they were both the same; but which is the new,
improved one?
The ones we are going to have made are the ones on the right; because we do have a set of drawings for that type.
Not all the
bits that need to be cloned are complex precise bits of machining.
We also need some interesting castings too. This is a rocker cover
from the MDB2. We need four of these. We’re pleased to welcome Bob
Smith to our team, with the hope that he will enjoy the title of
‘project patternmaker’, because this isn’t the only casting we
need.
Finally from
the roller, something that rocks our world. Proof that the pattern
shop at McLarens did not have a proofreader. We don’t need to clone
the radiator, but we do need to clone the spelling mistake:
Tuesday, 5 February 2019
Gearbox fitted!
Rick,
Matty & Monkey have overcome the interface issues which left the
gearbox on physical chain block and storyline cliff hanger in the
last report. Overcoming the interface issue, meant a trip for the
clock side mounting plate.
In
this view of the gearbox being finally lowered into the frames, the
fact that the engine and gearbox are not on the centreline of the
locomotive is all too apparent.
This
photo shows the final drive gears (external to the gearbox) and the
drive chain from the layshaft to the leading axle and gives an idea
of how little room there is between the gearbox and longitudinal
frame stretcher to squeeze the new clamping plate in.
On
the engine side there the clamping plate is positioned outside the
frame stretcher (hence the need for the spacer ring described in the
11/10/18 report. As it is a new component the clamps are assembled
with metric bolts.
There
is a cast iron spacer which sits on the layshaft and holds the gearbox
in place laterally. This has been trimmed back, so that it now
locates on the clamping plate rather than the gearbox. Two flats have
also been machined off to allow the spacer to fit between the clamp
plate bosses.
With
the gearbox now fitted the interior has been cleaned up. While the
working of the gearbox was described in the 6th
December 2017 report, it will not harm to describe it again. By moving
the bevel gears on the upper shaft to the left or right (so that they
engage with the unseen gear on the incoming drive shaft) the upper
shaft can be made to rotate clockwise or anticlockwise. The motion is
transmitted by chains to the lower shaft. On the bottom shaft
whichever dog clutch is engaged determines if you are in the high or
low gear.
Close
up of the lower (speed) shaft. The splined output drive shaft cab be
glimpsed between the dog clutch teeth on the left hand side. The
selector (see image below) engages with the central groove to move
the clutches left & right.
Close
up view of the forward/ reverse gears. No work has been done to these
gears, other than a clean-up.
Gearbox with chains and selectors re-fitted.
Crank
operating the high/low gear selector, possibly made at Britannia
Foundry (see 6th
December 2017 report).
Oil filler re-fitted (original pot, replica cap, see
24th June 2017
report).
Matty
eschews Ricks handiwork with the oil filler and pours another 5
gallons of oil into the ‘box.
Another
milestone reached!
Subscribe to:
Posts (Atom)